Fall is more than just a season; it’s a feeling. From apple orchards and flannel to pumpkin spice lattes and candles, you have plenty to feel giddy about as the air gets crisper and the leaves change color. If you’re looking to celebrate autumn on a budget, look no further than the Moving Help® Marketplace’s DIY fall decorations for a cozy home. You likely already have the materials for these six simple crafts, so grab some twine and start crafting.
Leaf Lanterns
Have you ever found a cool leaf and wished for a way to preserve it? Decoupage leaf lanterns are the perfect DIY fall decoration for you to bring the forest to your home. Light a candle and bask in the leaves’ warm glow.
Supplies
- Leaves
- Glass jar
- Mod Podge
- Foam paint brush
- Tea light candle (real or fake)
Step-by-Step Instructions
- Prepare the leaves. Go outside to collect leaves that are flexible, not dried, and vibrant in color. Red, orange, and yellow leaves are best for radiating your candle’s warm glow.

- Prepare the jar. To ensure your leaves lay flat, choose a jar with little to no bumps, decorations, or engravings. Recycled food jars often work great. Start with a jar that is clean and dry.
- Adhere the leaves to the jar. Using your foam paintbrush, apply a thin layer of Mod Podge to the back of each leaf and adhere the leaves one-by one on the jar. The Mod Podge won’t dry immediately, so you can rearrange your leaves as desired.
- Seal your design. Once you’re happy with your leaf design, seal the leaves to the jar with a topcoat of Mod Podge. The glue’s moisture can make your leaves delicate and fragile. To avoid ripping the leaves, use the foam paintbrush in a gentle tapping motion to apply the Mod Podge.
- Dry. Allow your jar to dry before placing a candle inside and lighting it.
Coffee Filter Marigolds
Real flowers wilt and fake flowers are expensive. With coffee filters and food dye, you can make your own marigolds that last forever and don’t cost a fortune. Place them on the mantel, hang them from the ceiling, or stick them to the wall for a pop of color and texture.
Supplies
- Coffee filters (8 per flower)
- Food coloring (red, orange, yellow)
- A few small cups
- Water
- Spoon, stick, or something for stirring
- Scissors
- Stapler
Step-by-Step Instructions
- Prepare the coffee filters. Lay 8 coffee filters flat on top of each other in a stack. Fold the stack in half 3 times until you have a long, narrow triangle shape.
- Cut the coffee filters. Use scissors to cut a scalloped pattern along the curved side of the folded coffee filter stack. These scalloped edges mimic petals to add texture to your final flower.
- Prepare the food coloring. Fill each small cup with water and stir in 3-5 drops of food coloring. For a traditional marigold, use red, orange, and yellow food colorings. Feel free to mix and match the food coloring of your choice to create tie-dye coffee filter flowers suitable for any occasion.
- Dye the coffee filters. One-by-one, dip a cut and folded coffee filter into the cups of colored water. Dye the top half of the coffee filter with one color and the bottom half with one color to guarantee dynamic, realistic shading for your final flower. After dying, unfold the coffee filter and allow it to dry completely before proceeding to the next step.
- Assemble the marigold. Arrange your dyed, unfolded, dry coffee filters back into a stack and staple the middle. Pull up the top filter so it stands vertically around the staple. Repeat this process one-by-one with the next filter in the stack until all the filters are scrunched around each other. Finally, fluff and arrange the filters until you’re satisfied.
Dried Orange Garland
Dried oranges are a classic decoration that’s simple to make, stores easily, and can be reused every year (or kept up year-round). Hang your garland in a window for a natural suncatcher.
Supplies
- 2 to 3 oranges
- Sharp knife
- Paper towels
- String or twine
- Embroidery needle
- Baking sheet
- Parchment paper
- Oven
Step-by-Step Instructions
- Prepare the oven. Preheat the oven to 140 degrees Fahrenheit or the lowest temperature it accommodates. Line a baking sheet with parchment paper.
- Slice the oranges. Using a sharp knife, slice the oranges as thinly as possible. Strive for 1/8th inch thickness. Thinner orange slices dehydrate faster in the oven.
- Prepare the orange slices for drying. Using a paper towel, gently press out excess juices from the orange slices. Then, arrange the slices on the parchment-lined baking sheet in a single even layer.
- Bake the orange slices. Bake the orange slices for 2-4 hours until completely dry, flipping the slices halfway through the baking time. Every so often, slightly open the oven door for a few seconds to release steam.

- Assemble the garland. Once the orange slices are completely dried and cooled, string them together with a needle and string/twine. A traditional sewing needle likely won’t be big enough to hold the thick string/twine, but an embroidery or darning needle should be suitable.
Recycled Cardboard Flower Garland
If you prefer the look of chic, subdued DIY fall decorations, give your paper towel tubes a new life by transforming them into a flower garland. The cardboard’s neutral earth tone adds a subtle accent to your home without overwhelming your existing interior design.
Supplies
- Cardboard tubes (from paper towels or toilet paper)
- Scissors
- Hot glue gun and hot glue sticks
- Hole punch
- String/twine
Step-by-Step Instructions
- Cut the cardboard tubes. Apply gentle pressure to the cardboard tube, slightly flattening it for easy cutting. Then, cut the tube into 1/2-inch loops.
- Glue each cardboard flower petal pair. To create a flower petal pair, fold a cardboard loop in half and adhere it with a dot of hot glue near the crease. Now you’ve created one “petal pair,” which looks like two flower petals joined together.
- Assemble the cardboard flowers. To assemble a flower, glue several flower petal pairs together. This is a similar process to creating the flower petal pair, where you’ll place a dot of hot glue near the bottom of the petal pairs. Use more (5-7) petal pairs to create a denser flower or keep your flower lighter with just a few (3-4) petal pairs.
- Assemble the garland. Use a hole punch to make a small hole in the top of each flower. String the string/twin through the holes to assemble your flower garland.
Autumnal Paper Chains
Paper chains aren’t just for children; they’re a simple, affordable way to incorporate cozy fall colors in your home. Drape paper chain garlands to decorate doorways and ceilings or use a paper chain to count down the days until your next favorite fall holiday.
Supplies
- Colored construction paper
- Scissors
- Stapler
Step-by-Step Instructions
- Cut the paper strips. Cut your paper into strips that are roughly 8 1/2 inches long and 1 1/2 inches wide. Feel free to experiment with different measurements; thinner strips can be shorter, while thicker strips should be longer to complete a full loop. You’ll need at least 15 strips to create a solid chain.
- Assemble the paper chain. Start by forming one strip into a loop and stapling the ends together. Place another strip through this loop and staple it into its own loop. Repeat the process, interlocking the loops until you reach your desired paper chain length.
- Experiment with different materials. Ready to level up your chains? Swap out paper for ribbon! Use a variety of ribbon colors, patterns, and textures for a sophisticated look. Instead of staples, close the loops with hot glue or sewing.
Pinecone Bird Feeder
You’ve filled your home with DIY fall decorations, so why not bring the fall crafts to your yard? Hang this pinecone bird feeder near a window, grab a hot drink, and settle in for a cozy afternoon of birdwatching.
Supplies
- Pinecone
- String or twine
- Natural nut butter (peanut, almond, sunflower)
- Spoon
- Birdseed
- Plate
Step-by-Step Instructions
- Choosing nut butter. To ensure the birds’ safety, choose natural nut butter with no additives. Natural nut butter can be a healthy protein source for birds. Meanwhile, the sugar, salt, and other additives present in processed nut butters can be dangerous.
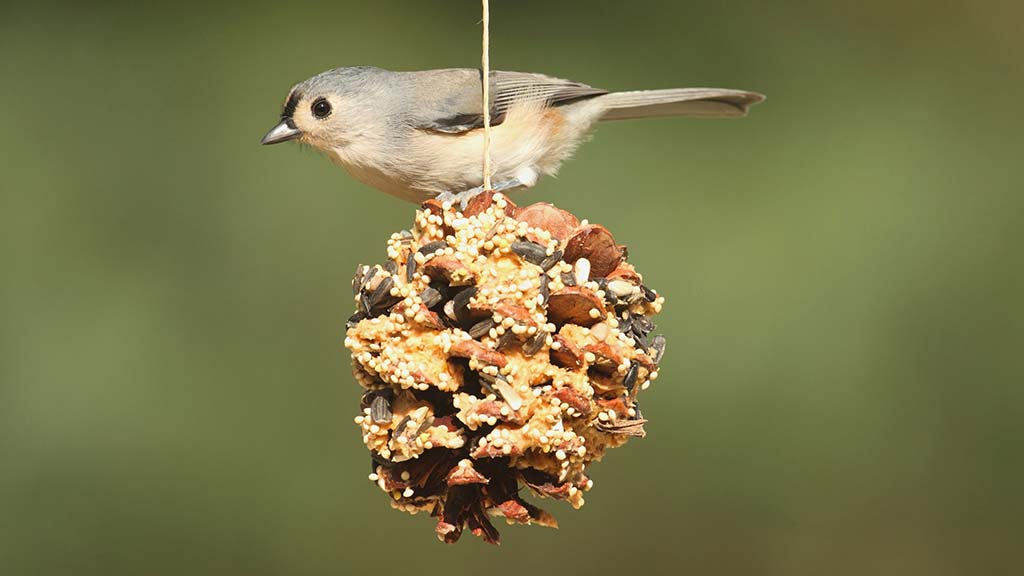
- Prepare the pinecone. Start by tying a loop of string/twine around the top of the pinecone so you can hang the completed pinecone bird feeder.
- Prepare the birdseed. Pour a small handful of birdseed onto a plate.
- Coat the pinecone. Use a spoon to coat the pinecone in nut butter, focusing especially on the pinecone’s inside layers. Roll the sticky pinecone in the birdseed on the plate until fully coated.
Fill Your Home and Heart With DIY Fall Decorations
Fall is so much more than just pumpkin spice and flannels. It’s about enjoying the fall colors and cool weather too. With these six DIY fall decorations, your home and your heart will get into the festive spirit in no time.
After all, everyone loves to enjoy a fall, cozy home.
For other DIY ideas, check out these DIY and decor blogs, DIY TikTokers, and renter-friendly DIY projects.